Creating a 3d Bust: from 2D concept to render
- Thivolan

- Oct 23, 2025
- 15 min read
Updated: Feb 8

In this article i will go through a quick review of the drawings, sculpts, renders and a few tips and tricks i used to make all of this possible. Just like all of my articles, this is yet another WIP and will follow the progress of the sculpt until done. Dont worry, though, this model is almost finished (I just have the hair and some finer details to sort out) so you wont have to wait long for a complete article!!!
DON'T LIKE READING? CHECKOUT THE VIDEO INSTEAD!!!
content:
The Inspiration for the model
This all started when i decided to up my portraiture game. In order to do this i studied a TON of faces but i also realised that all great portrait artists are also great caricaturists; this lead me to the really epic series by Court Jones; this was not a beginner series on the face but one to start caricatures and this was really the thing that helped push my portraits up to the next level!

Getting to the point here, one of the later assignments was to do a caricature of a caricature; take a caricature you've already done and go wild! This process really helps you to push beyond whats possible. And thats how i ended up with this completely mad caricature of Rob Riggle!

Part 1: Modelling
Zbrush: Getting this into 3D
Given that this is an article on the 3D side more than the 2D (You can always message me to include more and ill be happy to elaborate/ extend on any of the parts) lets hop right into Zbrush with some tips and tricks on how i started the primary forms, developed the secondary forms and, finally, pushed the tertiaries and hyper details!
START: When i sculpt a face i usually use the trusty default models provided by zbrush but given that this face looks nothing like a normal face i just started with the good ol' sphere and began the sculpt from there...

For those wondering what the limitations of using templates might be: Using them could influence the look/ proportions of the sculpt as well as stagnate your learning because the forms are already there with you not giving much thought to them etc.
PRIMARY FORMS:
This is definitely one of the most important parts of any artwork: getting in the forms that will stay with the sculpt right 'til the end. So as you can imagine, establishing this will lead to a smoother road down the, uh, road....

After this i will start to establish the forms that better represent the primaries and also the proportions and general silhouette. This will be something we will need to keep in mind throughout the sculpt/ any work you do.

Right now im focusing more on the main forms even though the anatomy etc. is still waaaaay off. Yes, even though its a caricature we still need some level of realism to pull the viewer into believing. Also, i am going pretty realistic with this sculpt so the use of anatomy and realism is a must. Caricature is basically Portraiture 2.0. So no, you cant just start caricatures out of nowhere if you cant do normal portraits....
Secondary FORMS:
Time to start pushing the forms here and that DOES NOT MEAN details, NO DETAILS.
I know its tempting but if you start details here you will miss the big picture; the primary forms.
BTW, most of the brushes im using here, and pretty much throughout the sculpt, are the normal brushes that come with zbrush: Smooth, Move, Dam Standard, Clay Buildup, Standard. And really, thats it! Nothing fancy. I will use custom made brushes later on for details. But i made those brushes using, you guessed it, the normal brushes in zbrush!

Tertiary FORMS:
The process after this involves more of all of what we've been pushing up 'til now... Thats it, really; the difference between a pro and a novice is the ability to identify, correct and change mistakes. The more you study the better you will get at this process of spotting an error and then correcting/ changing it.
So yes, lets keep at this and use what we (I) have learnt to really push the forms and ideas!

Hitting those Details:
I know it only took a few minutes of reading to get here but the process itself took me a few hours, well 14 to be exact. Okay more. Maybe 17. You know what, the number isnt that important, anyway... The point is that getting to this level takes quite a bit of commitment and time.
Here youll notice that ive put in a stand, corrected some proportions, and I have also fixed any issues i thought needed correcting. Also, ive made sure to really make the eyes as close as possible to his likeness as i could (yes i know they are small but it will really help down the line) The side view actually doesnt look too bad either...

Next up ill start putting in some really crazy details like the pores, wrinkles etc etc. But because i want to render this in a real-time environment i will first retopo the mesh in maya (or a 3d program of your choice). This can also be done in zbrush btw but I think doing it Maya will give me a better idea of what to expect since i will be rendering the final model there as well....
Part 2: Retopology
Before i actually start the retopo i will make sure to decimate the model; just as the name suggests this process will lessen the number of polygons so its easier to handle while still keeping a good amount of details.
After that i will take it into Maya and work out a relatively good scale; in my case the bust is about a meter in height, so in order to get the scale right i have to scale it up in zbrush by 50?!?!? Because scaling is a bit of a bitch in ZB i usually scale, export then undo the scaling in ZB. Also another thing to look out for is a surprise zbrush keeps under the export settings. It will scale the model up on it own by a random number unless you set it to 1! This sounds extra dumb but it helps as this is where we can scale it up by 50 before exporting without having to worry about scaling it beforehand then scaling it back down!

Finally, in maya, i will set up the scene quickly and use the live object option to make the High Poly object (the one I brought in from ZB) the thing that the topology will stick to; this helps retopo immensely and most programs have something similar to it....
I will then use mayas retopo tools under the modeling toolkit and quad draw. All the shortcuts for quad draw are right at the bottom with a drop down box to display them; its pretty self explanatory. Live object is the magnet thingy on the top of the menu (i didnt outline it in the picture but its highlighted in blue)

To be fair i should have retopo'd in ZB as that would have saved time and really this wasnt something that needed such delicate handling of polys as im not putting it in a game from 2014... so really i wasted time here but given that i'm making a tutorial i think people will get some value from watching why certain things are done the way they are etc etc...
What makes good topology?
People will give you a bunch of thoughts, opinions and ideas here but really the simplest way to ID good topology is if it works for the intended purpose(s). Thats it! Good topology is any topology that works for its intended purpose or purposes.
----------------------------------------------------------------------------
Does it have triangles? Yes/No
Is it being used for animation? Yes/No
--Insert other relevant questions here-- ? Yes/No
But does it still work for what you need it to? Yes - If no, start to fix the issues that hinder your answers!
----------------------------------------------------------------------------
Then its fine..... This is the loop (you can add other questions) you'll run through until you can answer yes to the last question....And theres the golden rule; theres no need to make the topo perfect, its a waste of time and effort, Just MAKE IT WORK!


retopology continued?
Yep, we have only just begun with understanding the topology. Here i will continue to retopo the face making sure the polys arent too crazy. One thing i would fix, however, is the fact that the flow by the mouth is a bit off. What i mean is that instead of curving the way the mouth curves i have disrupted the flow to go against the curve of the mouth ... Now this still works because im not animating it so given my guide for good topology, this still works out! But yeah it still bothers me that i did that...


One of the biggest reasons you want proper flow around areas of animation is so the polygons animate correctly. Putting poles (5 sided disruptors) around these areas will
start to mess with this; again we dont have to animate but its good to know this...

Once the face is done ill move on to the clothing and stand. And these are a bit easier as they arent too crazy when it comes to the forms etc

The back and forth of 3d
Just as a quick note before we move on to the unwrapping. The nature of any 3d pipeline is pretty much going back and forth on things like retopo, modelling, baking and even texturing.
What i mean by this is that no matter how experienced you are you will have to go back to retopo something because you realise the baking has shown holes on your topology or going back to texturing because your renders are showing that the colours are lighter than you want etc.
Each step iterates and also supports the previous and next step. So dont think youre just going to flow from modelling to retopo to texturing without backtracking and correction. A lot of tutorials dont mention this and so everyone thinks its just a smooth rides across each step; it really isn't, so keep this in mind when you make mistakes - everyone does it!
Part 3: Unwrapping and UV
Another great reason for good retopo is that it makes Unwrapping waaaay easier. Unwrapping refers to cutting up the retopo'd mesh in the UV space to lay out flat so that it will be easier to texture and bake.
Think of this process like printing out decals for 3d objects like Easter bunny chocolates or cars; the design has to be printed out on a flat piece of material before being applied to the 3d object. This is what unwrapping is for.

It does look kind of weird at first but this is basically the process; lay out the forms in 2d so they are easier to use in 3d. These examples above are relatively simple compared to what you will be doing, even for your first game ready stuff, but it gets the point across.
In Maya, i will start to "cut" the mesh so that its easier to unwrap. here are two examples of unwrapped faces. one has no cuts. the other has a few cuts so that to is less distortion when texturing


So as a general rule:
More cuts = less distortion + more Islands and, sometimes, more problems.
Less cuts = less hassle but also less space for the islands to stretch out and more opportunity for distortion.
A Look at my UVs:
Here is a quick view of my UVs laid out UDIM style. UDIMs are just taking your UVs and dividing them across multiple squares. Each square holds space for the Islands and the squares you use the more detailed you can get when you texture and vice versa. The only downside is the file size. So its not something you would use on really low end mobile games....


If these explanations are confusing you, you can always google them or ask me to elaborate and ill be glad to do so. BUt, right now i just want to give an overview so lets keep it moving!
Oh yeah, one more quick thing: The Islands cant touch or overlap the main grid lines or else the baking will throw an error. This is a very common error like having 5 or more sided polygons and open areas that arent welded even though they should be so look out for these as well!
Part 4: Baking & Texturing
Baking involves taking the high poly mesh and imprinting that information onto the low poly (Retopo'd mesh). This process is the culmination of the last two steps and involves going back and forth like i explained...


Once ive IDd that the bake looks good and the mesh doesn't need any changes ill go ahead bake the mesh finals at 4k for the necessary maps: normal, thickness, curvature, worldspace etc
Texturing:
This part has quite a bit of effort needed regarding colour, skin, height info etc. Theres really the understanding of the face that will drive the wrok being done; if you are clueless in that regard, like the anatomy knowledge for sculpting, then this step will be quite the drag.
So lets take it one step at a time and move from there.
Pre-planning:
First up ill start with some mask templates. For those of you who haven't used Substance before, using masks here is even more important than using it in photoshop. And just like photoshop it helps a ton! SO, what ill do here is create basic masks for parts of the face that we will need to select often like the areas around the eyes, cheeks, ears etc. Pre Painting and assigning masks to these areas will make them a lot easier to select and paint later...

Adding colour:
Here ill start to add the base colours that make up the face; lighter pink/brown as a base, yellower areas for the bony protrusions, redder areas for the areas that gather more bloo like the nose tip, ears and eye sockets.

Ill add secondary and tertiary colours to really boost the liveliness of the skin. Freckles, red splotches, darker areas, blue/ green for the stubble areas etc. THis stage, as you can imagine, relies heavily on your understanding of the colours and also the layering system in substance certainly helps...

The colours are all in one folder. The other aspects like roughness, sss, etc are on different layers for better control and manageability.
Theres obviously more to cover here but this is just an overview. You can check the full tutorial out which i will link at the top of the article later on when im actually finished with it but for now, like i said, this is just an overview.
Part 5: Rendering
Rendering is actually relatively easy, and simple, compared to the last couple of steps. The two big players here would probably have to be lighting and focus. There are other factors but i think ill just focus, ha, on these two for now...
Just like with most of the work in 3d there is going to be quite a bit of back and forth here as viewing your textured mesh in a render engine is a lot different than viewing it with lighting in substance...
Lighting:


If theres one bit of advice i can give here its that you should keep it simple! 1 main light, another fill light and 1 rim light with maybe another light for the background or ground etc thats it! Not 50 lights for each part of your mesh! This will ensure good, clean, succinct lighting that makes sense when viewed. It also means that you wont have to setup dozens of lights, just a handful.
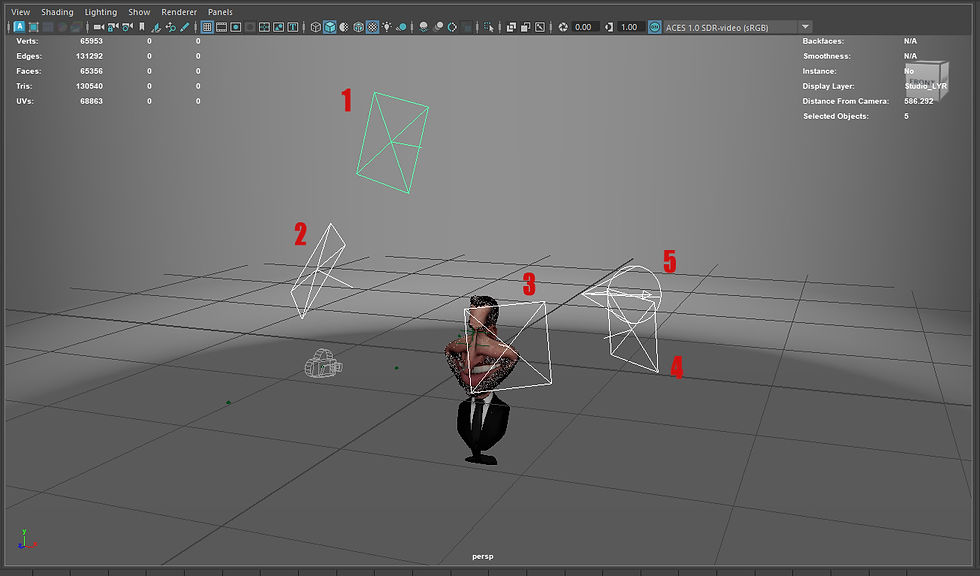

Now, obviously, theres waaaaay more to lighting than what ive just written about here but its a start. Lighting is another subject altogether and i would suggest researching how movies, classic artists and 3d artists handle this so you get a better feel for it.
Theres a lot of info out there but remember that simplicity is your friend throughout the entire creation process not just lighting!
Focus:
If lighting is the presentation of sliders being shown to the audience then the focus is the laser pointer gently guiding the viewer/ audience across the set of slides; it can be simple and gentle or chaotic and haphazard.
There is a scene in the hateful 8 by Tarantino in which he change the focus of the camera from one character in front to another in the back then alternates between them a few times.

This FOCUS's on what each character is doing and forces the viewer to concentrate on what is in FOCUS... This is an exaggerated example but blurring areas in you renders will enable the viewer to focus on certain, more important areas more as opposed to them just looking at everything all at once; Oh, i know you want everything to be in focus all the time but its just not a good idea. Even great artists like Rembrandt had everything in focus in his early works but even he eventually learned to vary and breakup his paintings

Part 6: Hair
Just as a quick overview here; i did a previous video on hair sculpting and drawing. So definitely check those out to get a feel for the mentality im going for when doing hair with xgen:
So, for those of you who havent watched the video (How dare you!?) heres a super-quick rundown of what makes hair look like hair:
1.) Hair is super complex and needs to be broken down into simpler shapes or clumps.
2.) Hair is a mass (so it has volume!) that sits on the head and therefore should not be represented as a flat 2d shape slapped on the head...
3.) Take these principles and use them to create simple but effective hair in stages and not a messy frock of strands!
And yes, all this is necessary to know before tackling hair in xgen as it will help to pave the road to success in this case!
WIP, MORE COMING SOON!!!!
Hey, it's me again!

Thivolan Moodley, Artist from Johannesburg, SA. Currently working as a freelance character artist. Also creating free and paid tutorials for the clueless- i mean enthusiastic (yeah that sounds better) artists out there!
Tutorials, socials and portfolio: https://linktr.ee/Thivolan3d


Comments